How to create your project schedule
- Define the Project Schedule
- What a Project Schedule Tells You
- Giving Yourself Time
- Add Planning Time
- Add Bidding and Negotiation Time
- Simplified Construction Sequence
- Determining Task Lengths
- Accounting for Potential Delays
- Wrapping up the Schedule
Define the Project Schedule
The project schedule helps you organize and think through how long the project should take. The most important thing in the beginning of the project is to make sure that you give yourself enough time.
![]()
TIP: Time can be your friend, or it can become your enemy. If you plan the project far enough ahead, you can control the project, but if you shoot from the hip, you’re always under the gun.
What a Project Schedule Tells You
A project schedule tells you the order of activities and how long they should take.
The typical project schedule takes the form of a bar chart called a Gantt chart; named after Henry Gantt who created this form of activity planner and tracker in the 1910s. The following chart is a simplified example of a Gantt chart.
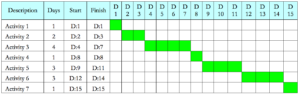
Figure 6. Gantt Chart Example
Gantt charts contains a list of activities, durations, start and finish dates, and other information if needed. The chart uses horizontal bars to indicate an activity’s duration, with the bar length and position corresponding to the scheduled dates.
Use the Project Schedule form to plan and maintain your project schedule.
Giving Yourself Time
Start by giving yourself enough time to complete each phase. Calling contractors a few weeks before the Fourth of July holiday, thinking they can get your project done before your family gets there on the third, is not realistic.
Add Planning Time
Add planning time to your schedule is a simple matter of making sure that you give yourself enough time to complete all the planning activities discussed in detail in the planning phase. For now, find the intersection of your project type and size on the following table to determine the average time needed to complete pre-construction activities and add the activity to your schedule.

Add Bidding and Negotiation Time
Adding bidding and negotiation time is a simple matter of making sure that you give yourself enough time to complete all the bidding and negotiation activities discussed in the Bidding Phase.
The bidding timeline includes the calls for bids, review, and contract issuance processes. Give yourself a minimum of one (1) to one and one-half (1 ½) months, before the expected construction start date, to complete the bidding phase.
The larger the project and the more trade bids you need to review, the more time you should give yourself to evaluate the bidders properly.
For now, just find the intersection of your project type and size on the following table to determine the average time needed to complete activities. We’ll talk about how you divide the time between bidding and the negotiation in Bidding – Bid Deadline.

Simplified Construction Sequence
The construction sequence, while simple in concept, in practice can become complex.
Regardless of project size, projects get constructed bottom-up due to gravity, and outside-in due to weather. Earth’s gravity pulls down on the structure so anything that hangs or stands, must have something to hang from, attach to, or stand on. Similarly, weather compels us to build and substantially complete the outer ‘skin’ of a structure, before installing interior finishes, fixtures and equipment.
The following is the typical order of construction for a one-story home:
- Site Work – level and prepare ground for foundations or slabs on grade
- Foundations – install underground structural support for aboveground structures
- Ground Floor – create the initial floor level or slab on grade
- Rough Carpentry – construct all wall frames and sheath exterior walls
- Roofing – frame roof structure and install weatherproofing materials
- Exterior Wall Sheathing – weather proofing of the exterior wall façade
- Doors and Windows – install doors and windows
- Exterior Wall Finishing – install exterior façade material(s)
- MEP Systems Rough In – install major mechanical, electrical and plumbing, ductwork, conduits, pipe, connections and equipment
- Insulation – install insulation in exterior and select interior walls
- Finish Carpentry – install interior wall and ceiling surfaces (drywall), trims and moldings
- Ceilings, walls, and floor finishes and/or coverings – examples include: painting, wood flooring, ceramic tile, and wallpaper
- Casework – install cabinets, shelves and fine woodwork
- MEP finishes – install mechanical, plumbing, and electrical controls, fixtures, switches, outlets, and faceplates
- Window and Door Coverings – install drapes and shades
- Punch List – clean and discard debris, complete remaining items, restore damage
Review the Construction Sequence Schedule, a representative example of how the previous simplified list of activities might look as a typical Gantt Chart (or Bar Chart) construction schedule.
Renovation projects are not as extensive as new construction, but there is always some “surgical” demolition involved to remove the old and make room for the new.
On the schedule sheet, make a list of your project’s construction activities. Use the outline above to help guide the order of activities.
Determining Task Lengths
There are a few ways to find out how long each task should take.
You can read articles that give you an understanding of how long activities should take.
You can call local trades people and vendors and ask them how much time it would take to complete specific activities in your project. Contractors can be a wealth of knowledge, and they are often ready and willing to talk.
If you cannot talk to contractors or vendors, find a local project that you can visit regularly to observe the day-to-day changes as the job progresses. You can observe an active construction project and take the time to ask the contractor and/or subcontractors questions. Careful observation can be the best teacher of how projects come together.
Here are some of the questions to ask a contractor that will help you understand how long tasks will take:
- What are the steps involved in the job/task?
- What equipment is necessary for the task(s)?
- Are there any special provisions needed for the equipment?
- How long should each step take?
- How long will the whole process take?
- Is there any wait time between activities?
- What are the material deliveries or other lead-time(s)?
- What can go wrong and how would that affect the schedule?
- Do we need to wait before continuing?
Asking the above and similar questions will help build a realistic project schedule.
Another good way to find out how long trade activities take is to use the RS Means construction estimating books, which give you activity durations along with costs. Remember, you can find more information about acquiring the RS Means books at: www.rsmeans.com.
Accounting for Potential Delays
Project delays generally come from adverse weather conditions, material shortages, owner indecision, and contractor complacency.
In some cases, owners need to predictably account for project delays. While it is often difficult to predict when delays will occur in advance, it is possible to account for possible project delays in the schedule so you have time to deal with them when and if they do occur.
Adverse Weather Conditions
Adverse weather conditions are no one’s fault. The absolute easiest way to account for weather delays is simply not to worry about them in advance.
If you have to worry about them because your project requires outdoor work and it’s the ‘rainy season’, include a reasonable number of ‘rain days’ in your project schedule to account for any delays. If it’s winter, use the same method to include a reasonable number of snow days to the affected activities on your project schedule.
If you want to have things as accurate as possible, check the current Farmer’s Almanac to get an idea of how many days you should add.
Material Shortages
Material shortages can be the result of manufacturers selling out of product, or it can be a literal shortage of raw materials. When residential owners experience material shortages, it’s usually the former so the best thing to do is not worry about them, and to address them as encountered during construction.
Owner Indecision
Owner indecision during construction is a killer. Contractors go crazy when owners cannot make up their minds. It slows the whole project down and as we’ve said, for the contractor time really is money. The absolute best way to avoid owner indecision is to be true to the planning process and follow through by faithfully completing your project plan BEFORE you start construction.
Contractor Complacency
Contractors are often complacent and shoot from the hip when it comes to planning the project. This system will help you make sure that your contractors stay on the ball. We will talk more about how you use the schedule to maintain control during construction in the Construction Phase.
Account for weekends and holidays
Make sure to account for weekends and holidays in your schedule. You won’t get most contractors to work weekends and holidays unless you’re willing to pay more. Therefore, the best thing to do is to look at the calendar and make sure that you don’t plan any work on weekends and holidays.
Account for municipal inspector wait periods
The best way to account for municipal inspector wait periods is to talk with your local building department. Find out how much notice they need for the inspection. The time can be as little as a few days or as much as a couple weeks. Calling to schedule an inspection at the wrong time can create a delay, so you’ll want to know in advance, what your building department requires.
Account for any custom item fabrications
Owners sometimes pick custom items that require fabrication. Custom item manufacturers have their own requirements and limitations. Talk with the fabricator, manufacturer and/or vendor about the item in detail and weave the activities into your project schedule.
For example, depending on the material selected one of various trades could make a kitchen counter. To ensure a fit, after cabinet installation, the counter fabricator will come in and measure, then go back to the shop and fabricate. Depending on the material, details, and workload, fabrication and delivery could take between a few days and a few weeks during which time, cabinet finishing and hardware installation would continue. When complete the counter fabricator comes back to install the finished product.
Notice that the counter activity starts before the cabinet activity is complete and can finish after the cabinet activity is complete.
Asking questions that help you understand what is typical, what typically goes wrong and how delays can occur, will help you make contingency plans for when problems arise.
Wrapping up the Schedule
Use this Project Schedule Checklist to make sure you have everything included.
Review the Construction Sequence Schedule, a representative example of how the previous simplified list of activities might look as a typical Gantt Chart (or Bar Chart) construction schedule.