Creating the Project Budget
The project budget identifies and manages your project costs.
- Set the Project Budget Range
- Use Cost Estimating Resources
- Estimate Material Quantities
- Identify the Base Scope
- Identify any Alternates and/or Options
- Set Your Priorities
- Include Insurance
- Add Contractor Overhead and Profit
- Include Permit Fees
- Include inspection fees, as needed
- Included final housecleaning material and labor costs
- Add Contingency
Set the Budget Range
Maybe you already know what you want to spend, maybe you don’t. Think of your budget as a target.
Ideally, what you would like to spend is the bull’s eye. The most you can afford, is the outside edge of the target. Together they define the size of your target.
If you have a firm idea of your budget, make note on the Project Budget Form. If not, jot down what you feel and work this out as you work ont he other parts.
The larger the budget range the more ability you have to include options, and absorb changes for unforeseen conditions. The smaller the budget range, the less flexibility you have and more deliberate you will have to be.
Your goal is to hit the target somewhere between the bulls-eye and the edge. Setting the target size helps you determine what fits in your budget.
Use the Project Budget Checklist to keep track of everything you’ve completed.
Use Cost Estimating Resources
There are a lot of resources out there now days, but the best ones are impartial.
RSMeans.com and Craftsman (not to be confused with Sears brand), are among the most well known.
To help get the most rounded and accurate numbers, use square foot costs as well as unit costs.
Square foot costs are costs per square foot for a group of related items. Unit Costs are costs for individual material installed units.
Use square foot assembly costs when you want an idea of what a group of items costs together per unit of area. Use unit costs to get to the most accurate estimate.
Combine information from different resources as needed, to create your budget. Just be sure you understand what the numbers include or exclude, so you don’t double up or forget something.
Make note on the Project Budget Form of which source you used and how you calculated the number in case you need to recalculate it later to account for changes.
![]()
TIP: Regardless of which cost-estimating resource you use, remember that costs escalate over time due to inflation, so use the most current information available.
Estimate Material Quantities
Manufacturers and vendors sell products and materials in differing units and quantities but usually price materials similarly. For example, all tile manufacturers sell tile by square foot, though the quantity per box, does vary to keep the weight manageable.
Use these calculators to figure out how much material you need.
Knowing how to quantify materials helps you understand how to estimate the cost of project items. Here is a basic description of how materials are sold by division.
Division 2 – Dirt, soils, gravel, rocks, and mulch
Granular materials are sold by cubic yard, or by ton. Not all materials in this category weigh the same, or cover the same area for the same weight of material. For example, one cubic yard of stone is much heavier than 1 cubic yard of potting soil, and won’t cover the same area with the same depth.
Division 3 – Concrete
Concrete is sold as a mix per bag, or by 9-yard truck. Cubic yards add up fast. One cubic yard is 27 cubic feet and generally, one cubic yard of concrete will be a little less than one cubic yard after the concrete has cured or hardened. Concrete generally shrinks about ½ inch over 60 feet as it’s curing (drying), so shrinkage is really only a problem in large quantities. Concrete starts curing the moment it is mixed, so a concrete truck cannot travel more than 2-hours before having to pour its contents. Additives can adapt the mix to varying conditions, but also increase the cost of material.
Division 4 – Masonry
Masonry sells by unit, square footage, or ton. Most residential retailers, like Home Depot, will sell masonry by the unit, while contractor suppliers will sell by square foot or ton. The type and thickness of the stone will greatly vary the amount of square footage of material per ton. Your local supplier can tell you how many tons of material you need for your square footage.
Division 5 – Thermal and moisture protection
Materials such as roofing material sells by box, labeled in square feet. Siding sells by linear foot, or by piece, and moisture protection sells in rolls in varying widths and square footage.
Division 6 – Common building lumber
Lumber sells in linear, square feet, or board feet. Common dimensional lumber (i.e. 1”inch 4”s and 6”x6”s), are commonly sold by unit, in varying lengths. Sheet goods like plywood and OSB (oriented strand board) are usually sold in 2ft x 4ft, 4ft x 8ft and 4ft x 10ft sheets. Rough lumber from lumberyards usually sells in board feet.
Division 9 – Flooring
Flooring is typically sold in boxes marked in square foot or linear foot quantities. Sheet flooring like vinyl and carpet is typically sold by square yard.
Division 12 – Furniture and fixtures, and equipment (FF&E)
FF&E is commonly sold per unit, or in sets.
Use these Useful Conversions and Calculations to help you calculate your material quantities.
*Divisions not listed generally contain custom order items not priced with common unit prices. Contact vendors for assistance pricing custom items.
All of these varying measurements require making conversions between things like yards, feet, inches, square and cubic dimensions.
Use the diagrams you created and measurements you’ve taken to figure out how much material you need for your project.
As you identify your material quantities note it on the Project Scope of Work Form. If you can, organize the items by division, leaving room to add additional items; otherwise, simply write them down as you figure them out and reorganize the information later.
Identify the Base Scope
The base scope is the part of the project that you know at a minimum you must have done.
This work is includes only the essential project elements — the features that initially prompted the project, that without which project would not exist.
List the base scope items on the Budget Form to calculate that cost.
Identify any Alternates and/or Options
Alternates/Options are items you want to consider including or excluding from the project.
Define Adds when you want to consider some additional work, a better product, or a particular finish that will add cost to the base scope. Define Deducts when you have already defined what you really want in the scope but you are willing to consider some lesser quality to fit the budget.
You want to consider Adds and Deducts in the planning phase because it helps you negotiate the best price during Bidding – Bid Verification.
![]()
TIP: The best time to get the cheapest price is during bidding, because the best time to get the work done cheapest is when the people are already there. The worst time to negotiate the price is when the people are already there.
Set Your Priorities
More often than not, your wants, needs, and wishes will exceed your budget. So start thinking about prioritizing parts of your project. Breaking the project up in to Phases, will help you organize the project plan in affordable parts that you can stretch out over time.
Include Insurance
Now is the time to include the cost for the type of insurance you’ll require on your project.
These are the types of insurance you need to consider.
If you decide to go ahead without insurance, remember that can expose you to financially.
If you are including insurance, remember that the main contractor generally carries the insurance, so only apply insurance to either the subcontractor or general contractor, not both. Use the charts (below) for builders risk, general liability, and worker’s compensation to estimate your insurance costs.
Builders Risk
Builder’s risk insurance is protects insurable interest in materials, fixtures and/or equipment being used in the construction or renovation of a building or structure should those items sustain physical loss or damage from a covered cause.
To add this to your budget, find where the project size and general location meet in the following table:

Then multiply the percentage rate (PR) indicated in the table above for your project to total labor and material (TL&M) cost using the following formula:
PR x (TL + M) = BR
Record the cost “general” section on the Project Budget Form and be sure to update the cost as the cost of labor and material changes.
You will verify individual contractor policies later in, Bidding – Verifying Insurance Coverage.
General Liability
General liability insurance protects businesses from claims that result from normal business operations. To include this in your budget and account to the cost, identify the intersection between your project size and general location in the following table.

Policies can vary among providers, so make sure that you understand what your contractor’s policy covers.
To include general liability (GL) insurance in your budget, multiply the percentage rate (PR) indicated by the table above for your project, to either the sub-ontractors’ total labor and material cost or to the general contractor’s total labor plus material (TL&M) cost using the following formula:
PR x (TL + M) = GL
Record the cost of insurance in the “general” section on the Project Budget Form.
Workman’s Compensation
Workman’s Compensation protects workers from injury. To add the estimated cost of worker’s (or workman’s) compensation insurance (WC) to your budget, identify the intersection between your project size and type in the following table.
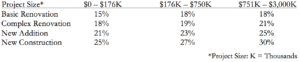
Policies are generally similar across the country, but not all places require contractors to carry it. Make sure you understand what your area requires.
To include workmen’s compensation (WC) insurance in your budget, multiply the percentage rate (PR) indicated by the table above for your project to either the subcontractor or to the general contractor total base labor (TL) cost using the following formula:
(PR x TL) = WC
Record the cost of workers compensation (WC) insurance in the insurance section of the Project Profile Form, and in the “general” section on the Project Budget Form and make sure to update the calculation as the cost of labor changes.
![]()
TIP: Understand your potential exposure; talk with your insurance representative to make sure that you have the right insurance coverage.
Add Contractor Overhead and Profit
Include the contractor overhead (OH) and profit (P) in your budget calculation for all the activities each contractor will complete. Contractors typically add about 10% in overhead fees, plus an additional 15% to 25% profit on top of that to the total labor and material they provide. Perform this calculation for the subcontractor and for the general contractor.
To include OH and P profit in your budget, use the following formula:
((Total Material + Total Labor + Total Insurance) x %OH (1.10)) x %P (1.15)
= Total Cost
Record the cost of contractor overhead and profit in the “general” section on the Project Budget Form and make sure to update the calculation as costs change.
Include Permit Fees
Permit requirements and fees differ vary. The best way to add permit costs to your project budget is to contact your local permit department, talk to them about your project, and ask them. The cost of permits is rather straight forward.
If you are in the early stages of estimating your budget add .5% (.005) to the total material and labor costs to give you a reasonable starting point.
To include permit fees in your budget, add “1” to percentages provided by the permit department governing your project, either to the subcontractor or to the general contractor total labor and material costs using the following formula:
(Contractor Total Labor + Material Cost) x (1 + Permit Fees%) = GL
Record the cost of permit fees in the “general” section on the Project Budget Form.
If the contractor pays to get the permit, add the contractor’s profit and overhead as indicated earlier to the amount.
Include inspection fees, as needed
Maintaining project control is a constant theme in the Construction Conductor program. One aspect of maintaining control is to eliminate conflicts of interest. This is one of those times. If the contractor pays for the inspection, the inspector will be loyal to the contractor. To ensure the inspector is 100% loyal to you, hire and pay them directly.
There are three different inspection fees you may need or want to include:
- Municipal Inspections – Performed by the municipality to ensure the builder is working in accordance with applicable building codes. The number and/or type of inspections typically determine the fee amount. Often these inspection fees are included in the permit fee. Check with your building or permit department to find out the cost of these inspections, if any.
- Bank Inspections – The number of inspections and the fee per inspection will determine the fee amount. Bank inspections are commonly required by lenders to protect the bank’s interest. They typically occur between the time the lender receives and pay the construction invoice. The lender pays for the inspection and passes the cost on to the borrower as a part of the loan.
- Owner Inspections – Fees vary. Owner inspections ensure quality and that construction is in accordance with applicable industry standards.
We’ll talk about inspections in Construction – Project Inspections.
For those of you with little or no construction knowledge or experience you really should hire ‘good’ professional inspectors to inspect the contractor’s work. At an average of $250 per inspection, use the following table to determine how much to include in your budget:

Include your estimated cost of contractor overhead and profit in the “Soft Costs” section on the Project Budget Form and make sure to update the calculation as costs change.
Included final housecleaning material and labor costs
Construction work can generate very fine dust that ends up everywhere. This is especially true for drywall dust.
Once construction is complete, the contractor will clean up tools and debris and generally leave the space free of unsafe conditions, but not clean enough to live in. There will still be a fair amount of dust left in the space. Often people find the cleaning more than they want to deal with and end up calling in a professional service.
Do yourself a favor, get prices now for a thorough post-construction cleaning, and include the amount in your budget. This way, if you want to do it later, it won’t become an extra cost.
Add Contingency
Contingency is money to set aside for unknown conditions. Unknown conditions arise from what cannot be seen, known, or foresee before starting a project. Most projects have some unknown condition.
Calculate contingency as a percentage of the overall project cost. Contingency generally ranges between 5% and 20%, with most projects falling within 10% to 15%. The amount used for contingency is a function of how much information one has and project type.
In new construction, the unknown is often usually underground. In renovation projects, it tends to be behind floors, walls and/or ceilings. Things like ground penetrating radar, drilling cores and testing help reduce contingency for new construction underground conditions, while contractor as-built drawings, preliminary investigations and testing help reduce contingency for renovation projects. There is never enough information to eliminate the need for contingency.
Using the following table, note that if you have no existing project information include 15% contingency. In a renovation project with as-built drawings, investigated conditions, and completed necessary material testing we can use as little as 5% contingency. However, very few projects include less than 10% contingency.

(Total Contractor Labor + Material Cost) x (1 + Contingency Percentage)
= Contingency Amount
Totaling Construction Costs
Now that you have calculated your total costs for contractor labor and materials, insurance, contractor overhead, and profit add all the totals together. The sum total is the Total Hard Cost. Write the total down on the Budget Form.
Separately, calculate the contingency and add it to the total hard cost. This is your potential hard costs. Remember, you’re holding the contingency to handle unknown items. You can be flexible with this number, but following the guidelines in Add Contingency is the one of the best ways to make sure you don’t get into trouble here.
Did you hit the bull’s-eye or miss the target completely?
If you’ve hit the target dead center, congratulations are in order because that virtually never happens. Take a little time to go back through your plan and to make sure you did not forget anything.
If you’ve missed the target completely, it means your project cost exceeds your budget. That happens a lot. Identify items you can compromise on, and look for alternatives that will lower your budget.
Use the Project Budget Checklist to keep track of everything you’ve completed.